EDIT: Original post was part of a longer discussion. Bits of this post have been modified to fit the bill for the 'first post' of a topic.
Painting your guns isn't that hard, but it's not hard to royally screw up either. Hopefully the guide below will help the unsure airsofter with a painting project:
My favorite by far is Duracoat. You'll need an airbrush (and mini compressor obviously) to apply the paint, but you really can't beat the results. Krylon is good if you're on a budget or if you plan on painting over it later, but Duracoat is there to stay once you apply it.
Before you paint anything, it is a good idea to fully disassemble it. You won't run the risk of accidentally painting something you didn't mean to, and it just looks more professional when it's done. Getting paint in between moving parts can also be a pain when you need to take something apart. A mag release or safety with excessive paint will stick.
Something else to consider when doing a more permanent paint job is to rough the surfaces of whatever you're painting. Some very fine sanding paper will do the job without ruining anything. Roughing the surface with fine grain paper will make it feel smoother to the touch (depending on what the material was) but it actually puts teeny tiny ridges and pockets in the surface of your project that help the paint bond and keep it from rubbing or scratching off.
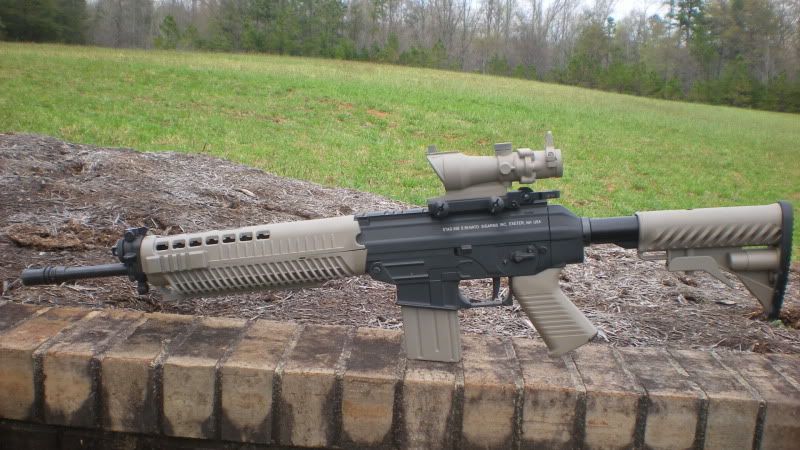
This is a picture of my Sig 556 which was painted with the techniques described above.
[img width=700 height=393]http://i53.photobucket.com/albums/g47/G ... 0749-1.jpg[/img]
That was quite a few months ago, and it still looks like I painted it yesterday.
Now then, when painting with a pattern, I go with Krylon. The subject was a bolt action rifle so I didn't separate the receiver from the stock, I just took the bolt and magazine assembly out before painting since a consistent pattern would look better for what I was going for.
For stenciling woodland patterns (all I've done) it's as easy as going out and grabbing some leaves, grass, or whatever flora you have living around your home. When going for effective (non-fashion statement) camouflage it's important to remember some things about how the human eye works. Your eyes are naturally drawn to:
1-Darkness. Black is almost never a good color for any kind of camouflage.
2-Consistent patterns. Pulling a net over your whole gun and spraying it will make little squares and rectangles in somewhat evenly spaced intervals. While this looks pretty badass (snakeskin pattern) it's not that effective for camouflage.
3-Familiar shapes. Almost everything in your house, car, etc is a common geometric shape. Think about it. Computer screen? Rectangle. Frying pan? Circle. Fridge? Rectangular prism. Soda can? Cylinder. Squares, rectangles, circles, triangles, (and their 3d variations) etc are not good for camouflage because they are not naturally occurring shapes. Did you know that there is literally nothing in nature that is perfectly mathematically circular? If you see a perfectly black circle in the middle of the woods, you can bet it's a sniper's scope pointed right at you. Little did he know that making a 'birds nest' inside of his sunshade would have prevented that without impairing his vision through the scope.
(That last one was long, but it needed to be explained fully)
Ok, so know that the anatomy lecture is over...
Put your base coat down in a light color. I will explain why later. After you've done that, lay your stencils out (at varying distances, you want inconsistency, NOT patterns) and do modest passes over them with a slightly darker color. It would be best if it was a darker variation of your base color (like brown on top of tan). If you want to add a 3rd color, go for it, but I've found that the best jobs are simple.
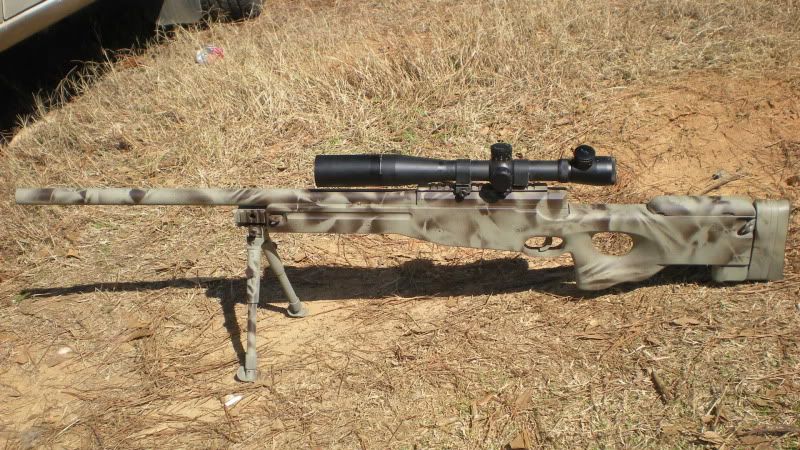
Here is a photo of an L96 I painted around this time last year:
[img width=700 height=393]http://i53.photobucket.com/albums/g47/G ... CN0591.jpg[/img]
Notice that I didn't paint my scope. It costs more than the gun, so HELL NO I wasn't about to paint it, lol.
But also notice where I went a bit too heavy on the dark brown near where the bipod attaches. If you relax your eyes when you view this image you'll almost always be drawn to that part of the gun because of the excessive darkness. You want a natural, even dispersion of darkness and light.
Now then, here's why I said you put dark colors OVER your light ones. When viewed from a distance, it creates a 3D effect on the eye that makes you overlook this geometrically shaped object as part of the background of whatever you're viewing. Back when they actually taught you how to apply facepaint in the military they taught you to put lighter colors on the 'shallow' areas of the face (eye sockets, base of chin and lips, edges of cheek bones, etc) and dark colors on the protruding parts of the face like the nose, chin, brow and forehead, etc. You always blend them in of course, but that's the way you're supposed to do it.
If you don't believe this technique (and you've got time) paint a gun brown with tan highlights and put it next to a gun that's tan with brown highlights and you'll see that the tan one blends in better every time.
That's about all I've got to say about painting. If enough people approve of this post, I'll move it to a more permanent position. A how-to-guide maybe?
Gabe's Painting Tips
Gabe's Painting Tips
Last edited by Gabe on Wed Mar 31, 2010 3:57 pm, edited 1 time in total.
-
Tzer1993
- I do in fact have a life.

- Posts: 562
- Joined: Mon Sep 28, 2009 1:42 pm
- Location: Newberry, SC
Gabe's Painting Tips
Wow. That was thorough. Probably the best "how to" post I've read so far

Re: Gabe's Painting Tips
I'm the admin, and I approve it.Gabe wrote: If enough people approve of this post, I'll move it to a more permanent position. A how-to-guide maybe?

There's no kill switch on awesome!
-
Esteban
- I do in fact have a life.
- Posts: 721
- Joined: Tue Sep 29, 2009 9:35 pm
- Location: Suwanee, GA - Clemson, SC - Sumter, SC
- Contact:
Re: Gabe's Painting Tips
That SIG looks amazing 

KWA M16, KWA M4 RIS, KWA KP8 NS2, Echo 1 G3, Echo 1 P90, G&G MC-51, JG MC-51 RIS, UTG Trishot
Roger that! Tango Alpha Mango Salsa.
Re: Gabe's Painting Tips
Cool, glad everyone likes it! I'll be sure to try and write more stuff like this. It mostly depends on what people want to see, as well as what I comfortably know a LOT about. I'd rather produce a few quality guides and how-to's than a lot of bad ones.
-
Jeremy314

- I do in fact have a life.
- Posts: 532
- Joined: Mon Jan 25, 2010 11:27 pm
- Location: Myrtle Beach, SC
- Contact:
Re: Gabe's Painting Tips
Gabe just start out with things you do a lot and feel comfortable with. If thre's something we'd like to know after those, I'm sure people will ask you if you know or if you could do a How-to guide about it.

VFC KAC PDW * WE PDW * KWA MP7A1 * KWA G36c * G&G CM M4 custom
2013 OPs: Mission: Double Cross Vet * SQA Skirmish 4/6/13 Vet
2014 OPs: OP: Iron Marches Vet
-
Bushmaster

- I do in fact have a life.
- Posts: 1671
- Joined: Sat Oct 10, 2009 1:34 pm
- Location: Alcolu, SC
Re: Gabe's Painting Tips
The L96 is beautiful!
"Do not pray for an easy life, pray for the strength to endure a difficult one." - Bruce Lee
-
GARRETT
- I do in fact have a life.
- Posts: 2221
- Joined: Mon Sep 28, 2009 1:19 pm
- Location: Newberry SC
- Contact:
Re: Gabe's Painting Tips
Nice how to Gabe. Which post are you talking about man.Gabe wrote: OMGZ Garrett! Your A-Post is upside down!

Re: Gabe's Painting Tips
He's referring to your front sight in the original thread, Garrett.
There's no kill switch on awesome!
-
GARRETT
- I do in fact have a life.
- Posts: 2221
- Joined: Mon Sep 28, 2009 1:19 pm
- Location: Newberry SC
- Contact:
Re: Gabe's Painting Tips
Oh haha. Sorry man. Brain was not active. Yeah I did that on purpose actually. Got in the way of my optics, and I didn't want to remove it fully. Never know when a battery is gonna die and have to go back to iron.SteevoLS wrote: He's referring to your front sight in the original thread, Garrett.
Re: Gabe's Painting Tips
Not sure what level of realism or practicality you were going for, but a flip-down front sight is pretty inexpensive and easy enough to install. It certainly beats having to pop out the pins and flip the sight back over, especially if you were currently engaged when your main optic went down.
All in all though, I was mainly joking. You can rock your weapon however the hell you want, considering you spent your own hard earned cash on it, lol.
All in all though, I was mainly joking. You can rock your weapon however the hell you want, considering you spent your own hard earned cash on it, lol.
-
Tzer1993
- I do in fact have a life.
- Posts: 562
- Joined: Mon Sep 28, 2009 1:42 pm
- Location: Newberry, SC
Re: Gabe's Painting Tips
He did it to bug people is all... 

Re: Gabe's Painting Tips
Gabe is the duracoat airbrush or aerosol paint? The only duracoat I've seen is for an airbrush. If you did use an airbrush what kind did you use.
A Fact of Life: After Monday and Tuesday even the calendar says W T F.....
Severed: if the back up to the back up back up rifle doesn't make people drool, you = fail
Airsoft Vet.
Severed: if the back up to the back up back up rifle doesn't make people drool, you = fail
Airsoft Vet.
Re: Gabe's Painting Tips
It's airbrush, but I don't know the brand. Whatever they have up at Airsoft Carolina is the one I used.
Re: Gabe's Painting Tips
Where did you purchase the paint, did you have to cut it or spray it out right.
A Fact of Life: After Monday and Tuesday even the calendar says W T F.....
Severed: if the back up to the back up back up rifle doesn't make people drool, you = fail
Airsoft Vet.
Severed: if the back up to the back up back up rifle doesn't make people drool, you = fail
Airsoft Vet.
